Monday, February 18, 2013

Ways To Bare Bulb your Flash


Most hot shoe strobes have a fundamental difference from monoblocks or other "studio strobes".

Studio strobes are "bare bulb" which means that the light they emit goes everywhere. Most (if not all) hot shoe strobes are directional, meaning that most of the light they emit goes forward.

Where you think about it, it makes sense. Hot shoe strobes are primarily used on camera (well, at least originally) and the main point of putting them on camera is to light distant subjects. This is why they are built to throw as much light forward. Even if today many photographers use them off camera, they are still designed and built mainly for throwing light forward.

The front of a hot shoe strobe has to be "bullet proof" as they are usually tossed in the bag, hence a plastic enclosure. Try throwing a studio flash in your bag, the unprotected xenon tube would break in a heart beat.

Studio strobes on the other hand, are almost never used without a modifier. To throw the light forward, you place a reflector on the head. But having the light go all ways makes them far more versatile when it comes to other light shaping tools like softboxes, beauty dishes, and actually anything that needs a wider dispersion of light.

This difference between hot shoe strobes and studio strobes can be a bummer for off camera flashers. Almost every modifier (maybe snoot and grid excluded) benefit from having a bare bulb flash.

Here are 3 different approaches for barebulbing a hot shoe strobe. Going from least efficient to most efficient, and from dumb-proof to please don't do this unless you are a certified electrician.

1. Wax-Fenning It

The Wax-fen is probably the easiest mod of the all here on the blog, all it take is a sheet of wax paper and some tape. (If you wanna take it up a notch check out the Stofen Omni-bounce.

2. Voiding a Lumopro warranty

This modded LumoPro 160 from RapidGrapher looks as sweet as it gets. There are no instructions on this one, but there are some general notes on how the assembly was made:
  • Removed and disabled factory zoom/flashtube assembly, and converted to bare-tube/bare-bulb
  • Modified internal power circuit for a 25% increase in power to 75w-s (subsequent recycle time was increased by about 1 second when powered by 6v SLA battery)
  • Added DC power jack for external power source (6v input)
  • Swapped out factory hot shoe foot for a metal foot with 1/4"-20 threaded base (new foot came with redundant test fire button and PC sync port)

Are those instructions complete? heck no! and this is good, dont go modding strobes unless you are absolutely sure you know what you are doing! The internal capacitor can give you a nick shock if you are lucky and totally nuke you if you are not.


3. Pair A Couple Of YN560

This last and probably y favorite mod from Tilo Gockel brings together two YN560 speedlights on an aurora bracket, supported by a DIY aluminum bar. The smarts on this one, is the fact that the tubes were elevated to the focal point of the reflector, providing studio like experience.

Again here are some dim instructions. They should make sense to you if you are familiar with this stuff, or server as a printout when you get the instructions to someone who understands them. (if "cut the three wires leading to the flash tube" sounds like Chinese to you, go for the latter) - Click the image above to follow the instructions along with the picture.
  • disassemble / open the flash
  • cut the three wires leading to the flash tube (and mark them before, so you can connect them later-on again :-)
  • gently pull the tube out of its plastic housing (it is fitted there with some sort of rubber or silicone)
  • glue the fragile little tube in a guitar glass slide with the help of SUGRU (the guitar slide acts as some sort of protection)
  • glue the glass slide to an aluminum piece, bent in shape, also with SUGRU
  • assemble the flash again, but with the wires leading outside
  • glue the aluminum thingy on the flash -- you guessed it, with SUGRU .-)
  • reconnect the three wires with three additional pieces


Fail Proof Portrait Poses

Photography is no different. You don’t have to come up with a thousand new ways to pose someone. Use the ways that work for you and your model. Here are 5 of the best “go to” poses


2. Lean on me (or working the wall). This is a particularly good pose for people who are really awkward. Some people have a real awareness of their body and they will always look comfortable, but it’s not as easy as that for others. Simply giving your model something to do, like leaning against the wall, can be enough to relax them.


3. Jump in my Car. A car is another great prop. On a bright sunny day, the shade of a car will give you great light and again, your model will have something to do to help them relax.


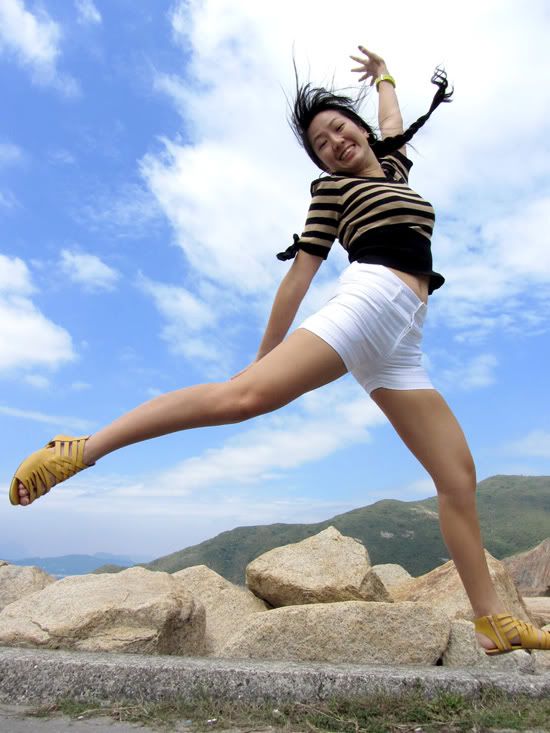
4. A leap of Faith. As with many of the other poses mentioned, if someone is awkward simply standing, giving them something to do can really bring the photo to life.


It’s not always easy but you can introduce some life and movement into the person and their clothes by getting them to jump or leap.

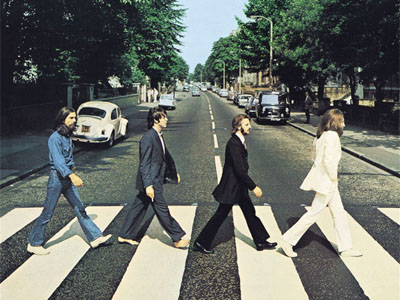
5. Walk the line. The walking shot is great if you want to capture groups, couples and singles. Shoot from a low angle with a fast shutter speed to freeze motion.


Monday, February 11, 2013

Controlling the Colour of Light: How to Play with White Balance


Photographers often question the strength, type and direction of light, but because most of today’s cameras’ auto-functions are greatly enhanced, it can be easy to forget about the colour of light.

Seasoned shooters will undoubtedly be aware of the importance of white balance, but for those new to photography or for photographers looking to go ‘off piste’ and take a more manual approach to image-capture then this whistle stop guide might be able to help. In this handy tutorial, it will explain not only the importance of controlling white-balance, but how it’s done and what effects can be achieved.


Why bother with white-balance?

By controlling the colour of light photographers are able to shoot with a balance that is as neutral as possible, replicating the colour of natural daylight whilst resolving issues with colour casts. Alternatively shooters can manipulate white-balance values for creative effect.


What is the problem with using auto-white balance?

Picture taken on Auto White Balance setting
Most contemporary cameras do a solid job at rectifying ‘problems’ with colour casts in the light, and so when a scene is put in front of the camera it will attempt to compensate for any shift in values to make the scene look as close as possible to natural daylight as possible. So say you were using an auto-white balance setting to shoot a scene flooded with a rich amber afternoon light, you may be disappointed to find the camera diluted the richness of the hue as it has attempted to cool down the scene by using a blue cast to pull back the colour balance to replicate that of natural daylight. Conversely, when you shoot with flash a cool tone is usually projected from the bulb, as such cameras set to auto-white balance will warm the picture up in-camera using an orange/amber cast. Another issue is night photography, as the colour of neon signs or street lights can often affect the camera’s reading and results in confused colour-cast frames. By setting the white balance manually you’ll find a more realistic result is attained.


How to control white balance?

1. Use Presets
Within your camera’s settings menu you should find a section labelled ‘White-Balance’. Here various presets are offered, each with an icon clarifying in what light the option should be used, for example; flash, cloudy, fluorescent, ambient, indoor, outdoor, sunset etc.  

By telling the camera what conditions you are shooting in, it can more accurately and consistently apply values to compensate. It is especially wise to use this mode if you feel the auto white-balance isn’t on point.

Picture taken on Custom White Balance setting
2. Use Custom
Whilst presets have their place, they can sometimes be a little wide of the mark, so to influence greater control find ‘Custom’ within the White Balance settings. This option allows you to take a reading by photographing an area of white or natural grey so your camera recognises and understands the exact lighting conditions you are working in.

If this is the approach you want to go with, it can be a good idea to carry a piece of white or grey paper, card or plastic to take readings from when you’re out and about.


What if I don’t want a neutral balance?

Using a manual white balance will allow you resolve colour cast issues in-camera, but just as it is possible to neutralise the colour of light, it is also possible to manipulate values to create colour-thrown captures. For example, to exaggerate the rich red hues of a sunset force the camera to pump up the colour even further by using the Custom option or use a Preset such as Daylight or Cloudy to make the camera ‘think’ it is shooting a dreary scene and as such will add a warming cast. The result will be a vivacious and colour-striking sunset. There are dozens of situations when using the ‘wrong’ white balance can enhance or exaggerate the colour values of an image, it just takes a little imagination and practice.

Different Type of Photographers


Times have changed. Digital cameras do almost everything for you now. To take a photo on the iPad you simply press on your subject, then take the picture!

For a photographer who grew up developing film and making prints, this is amazing. Sepia-toning a photo to make it brown took ages; now there’s an Instagram filter which does it, well, instantly.

So realise that for most people, learning the craft of photography isn’t necessary to get started. Sometimes some very famous photographers know next to nothing about cameras or lighting; they just have a good ‘eye’ – and great assistants! What is this artistic ‘eye’? Simply put, it’s the ability to ‘see’ a picture that others might miss. Cartier-Bresson had it; so did Avedon.

A photographer with a good eye can make better photographs with a phone than an untrained person could with the best camera in the world.

There’s a hint in the last paragraph; I used the word ’untrained’. Yes, it’s possible to get this elusive ‘eye’ for yourself. How? Well the best place to start is with the principles of Aesthetics.

Of course Art also requires an oblique approach to learning, covering psychology, philosophy and heightened self-awareness; but this is beyond the scope of this article.

Unless they’ve developed themselves in different fields, most people begin at square one. This is our first type of photographer.


The Untrained Photographer
The untrained photographer is someone who takes pictures. That’s all. They don’t really know what they’re doing or what they’re looking for. Of the billions of images of Facebook, most were taken by the untrained.

Of course there is no shame in this. Photography need not be part of anyone’s life. A camera can just be a useful tool to save and communicate life’s little attractions. And just by the law of averages, if they’re out and about and take enough pictures, maybe one or two will be great.

So how do we move on from this average state? We develop our technical skill, which we’ll deal with later, or we work on our Artistic ‘eye’.

Designers, painters and the fashion-conscious have a head start. I have a friend who finds no interest in sunsets or people’s faces. Don’t take your fascination for the world for granted; a lot of people don’t have it.

A large part of having a good ‘eye’ is colour consciousness. You can study which colours work well together. A combination of blue and yellow or red and green works well, for example.

It’s also very important to be aware of the world around you. The artist really looks at the world. They want to see what’s there, not what they think is there. Practice this.

As with most creative endeavours, experiencing what’s been done before is a catalyst for improvement. It therefore pays dividends to visit art galleries and study great artworks.

You may be doing all of these things already. Perhaps your childhood encouraged an artistic temperament. If you have a good eye already, well that’s half the battle won.


The Art Photographer

The artist doesn’t really know anything about photography, cameras, lenses or proper technique; but they do have a good eye. This takes them quite far, especially now with Instagram, Photoshop and the ever-improving ‘auto’ modes on digital cameras. They know what they’re looking for, but not how to get there.

It may be worth buying their finished work if the quality is good, but they’re unlikely to have enough consistency for you to consider commissioning them. They focus on the world too much and overlook the camera. Serendipity and clever dSLRs can only take you so far.


The Practical Photographer

Photography can be technically complicated, especially if you want the best image quality and need to use artificial lighting and post-processing. To develop a high degree of skill takes time and effort; so camera operators can be in demand.

Specialised equipment can also be prohibitively expensive, further limiting the supply of reliable image-makers. They’re a safe bet, but you can’t expect too much soul or originality.

Don’t assume because the subject is interesting that there’s much going on behind the camera. It’s perfectly possible to take uninspiring pictures of beautiful people or sublime landscapes if the focus is on niche techniques and maximising sharpness.


The Holistic Photographer

As in most things, a balance produces the best results. I’m talking about the balance between the Artistic ‘eye’ and technical mastery of photography. The Holistic Photographer knows what they want to create, and they understand how to control the camera to achieve it.

While very aware of the principles of aesthetics, they also have enough trust in themselves to break the rules when necessary. The camera becomes an extension of the mind’s eye, and the focus is on preserving moments or expressing ideas and feelings.


What To Do Next?
So where are you at on the journey? If you’re reading this, chances are that you’re already more advanced than most people, who are untrained. But are you focussing on developing your Art, or your Craft.

You can see that you will supercharge your own progress by balancing both. What do you need to concentrate on? Are more visits to exhibitions in order? Or would you benefit from a month spent shooting in Manual mode so you can master exposure? Why not have a look through your photographs with a friend and find out?

And the takeaway? You’ll get the best results by learning both the art and craft. Holistic Photography involves learning to See and communicating what you’ve seen effectively. It is having something to express, and understanding how to work with the realities of photography to create something tangible. Skilled artistic creation is worth striving for; you will find that it is its own reward.